Indoor Garden Handprint Art
Share
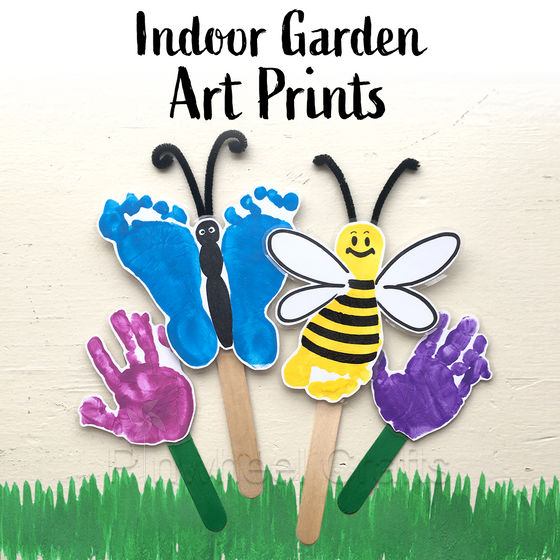
We’re back with more handprint art this week. Spring is a time of renewal and beautiful, green growth. If you are not fortunate enough to have access to an outdoor space to plant your own garden, then this post will help your children create their very own indoor gardens. This garden also comes with the added benefit of plants and insects that won’t die (no matter how much of a brown thumb you or your children may have).
If you’ve already seen our previous post about creating handprint art, or are already an expert on collecting beautiful handprints and footprints from your kids, click here to jump straight to the ideas! Otherwise, here is a brief guide on how to make good, clean handprints for your children’s artwork.
Supplies and Prep
First things first, let’s get our supplies together! Here’s a short list of things you will need for this project:
Non-Toxic Paint (acrylic or tempera work best)
Paper plates (for holding paint)
Brushes in large, medium, and small (can use paper towels, sponges, or fingers in a pinch)
Paper
Markers
Optional supplies
Googly eyes
Feathers
Chenille stems
Now we need to go over a little bit of proper hand printing technique. There are a couple of different approaches and pros and cons to each. One of the simplest ways to make a hand print is to pour your paint into a shallow dish (just enough paint to generously coat the bottom) and dip your hand directly into the paint. This is great for younger children that need their parents help and allows for multiple prints per dip. The downside is that it can get messy and the prints can appear a little blown out. If you’re looking for a more precise print, you’ll want to use a brush to apply the paint to your child's hand or foot. Coat their hand or foot generously, though, because if you don’t use enough paint and don’t move quickly enough, the paint can dry and leave a poor print. For this method, it’s also a good idea when you are making your print to use your other hand to gently press down on your child's fingers to apply the print more firmly to the paper. This will help you get a detailed, but more full hand print.
Plants and Insects
With the weather getting warmer, this post is focusing on creating art inspired by the outdoors! If you’re looking for something spring-themed, you can use your hands and feet to create a plethora of plants and insects (for the garden lover in your family).
Trees

This one is simple enough for most kids to do. Simply use a dark color (like black, brown, or forest green) and make a handprint with fingers-wide, facing up. Make sure to include some of the wrist as this will be the tree trunk. Using whatever leafy colors you like, dab fingerprints in a radius around the handprint until the tree looks as full as you’d like it to be.
Flowers

This is another simple one for beginning crafters. Just pick a color of flower that you want, press your hand to the paper (fingers up), then paint green leaves and a stem coming out beneath the palm. Your children can spread their fingers, or tuck them in, depending on what kind of flower they want it to be. If you have a hard time getting your children to get multiple handprints on one sheet of paper, you can also cut out the handprints and glue them to a separate sheet of paper with the stems painted on.
Butterfly

This is a fun print for babies and toddlers and works GREAT for springtime greeting cards! Using whatever color you want the butterfly to be, paint the bottom of your child’s feet (pro tip: only do one foot at a time and clean the foot before moving onto the next). From here, press their foot to the paper. If you have trouble landing the print where you like, you can also have your child lie down, hold their leg up, and press the paper to their foot. For the second footprint, use the same color, but press it next to the first print with the outside of each foot next to each other. Now you can add whatever playful details you like using paint or markers. We personally love to add antennae using chenille stems.
Bumblebee

This is a great project for families with multiple children. All you need to do is take a single footprint from each child using yellow paint. With the toes pointing down, simply paint or draw on black stripes, eyes, wings, and antennae. As a final touch, write each child’s name under their print.
For an added bit of fun, you can cut out your children’s bumblebees and butterflies and glue them to a jumbo craft sticks. Viola! Fun, little, garden puppets for your children to play with.

Happy crafting!
Pinwheel Crafts


